Category Archives: 4×4 Tech

How to fix, maintain or modify your off road adventure truck is here. We also discuss gear and how it holds up out on an adventure.

2007 toyota fj cruiser arb bumper

From A Land Down Under

arb 4x4action summer 2010 coverCan I get a hot shower in the bush…  Who is behind 4WD TV…  How did the “Drive 4 Life” turn out…  Is there a good one woman tent out there…  Can a pig really drink beer… And what else are the crazy Aussies up too…

The new ARB 4x4action newsletter summer 2010 showed up in our in box.  As we’ve told you before, this news letter comes from the Australia head quarters so there is a big down under influence on the articles which give you a new point of view.

This quarters publication offers an opportunity to win an ARB recovery kit as well as an ARB air compressor.  Of course if you don’t win you can still read about the Aussies trekking across Africa.

If you’re not on the ARB list to receive your own free issue, we highly recommend it. Yes it is an on-line infomercial but it is also filled with great off-road adventure information.

cartoon toyota fj cruiser

2010 FJ Cruiser Still Going Strong

The Toyota FJ Cruiser continues to be one of the top selling off-road adventure SUVs.  The rig has not changed much over the years and continues to stay true to its rugged off-road roots and long land cruiser heritage.  The most notable change are the new engine updates that now delivers 260-horsepower @ 5,600 rpm and 271 lb-ft @4,400 rpm from the 4.0 liter DOHC 24-valve V6.

Fuel mileage remains an anemic 15 city, 19 highway for the 4WD, 6 speed manual transmission and 17 city, 21 highway with 4WD 5 speed automatic transmission.

Toyota’s FJ Cruiser continues to be one of the few 4WD trucks that out of the box is capable of bombing down desert roads, meandering over 4×4 trails or taking you on extended off-road adventures.  Continuing since its introduction in 2007 the Toyota FJ Cruiser maintains a huge community of dedicated followers who appreciate its quality engineering and quirky styling.

trail tracker webpage

Trail Tracker

Every think that you need a place to keep track of the off-road trails trails you’ve driven so you can share them with others?  Ever wonder where you could go to find 4×4 trails in other locations that you want to explore?  Well wonder no more…

As Toyota makes a push to show the world its new 5th generation 4Runner and FJ Cruiser are tough off-road trucks, it has created a website dedicated to sharing trail information.  The web site is built to share GPS coordinates, directions, pictures and trail descriptions with others around the world.  The site, Trail Tracker allows you to set up a profile and than track the trails you have wheeled by either uploading your own trail or adding those shared by others to your favorites.

Toyota’s Trail Tracker has tremendous potential.  Today there are only a few dozen trails logged allowing almost everyone to upload a “first” for their favorite 4×4 trail.

And than there is “Aren’t you pointing out trails to the environmental groups who want to close them down?”.  I don’t believe so.  I actually feel this is a tool to help prevent trail closures.

  • Groups that want to close trails, know where the trails are.  This is not going to show them any trail that is not already known or on their watch list
  • The best way to prevent trail closure is to follow the ethics set out by Tread Lightly and demonstrate good stewardship of the land we wheel
  • Toyota has a vested interest in trails remaining open to sell more off-road vehicles.  They legitimatize the sport to some extent by showing their participation
  • The site can show the strength of the wheeling community by exposing to non-wheelers the number of families that wheel and where we wheel responsibly

You can not change the minds of those against off-roading… We can continue to educate those who are not aware of all sides of the issue and this site can be one of the educating tool. In the end it is up to each of us to always put our best wheel forward when we are on the trail, in a public forum, or simply talking to our friends and neighbors about what we do with our rigs.

The Trail Tracker is still new and it is up to our wheeling community to make it into a resource we can all use.  What trail are you going to up load?

UPDATE:Toyota has taken down their Trail Tracker website.  And while this site is gone we will continue to share with you great off-road resources that we find.

night camp cooking

The 4×4 Gourmet

cooking over open fire
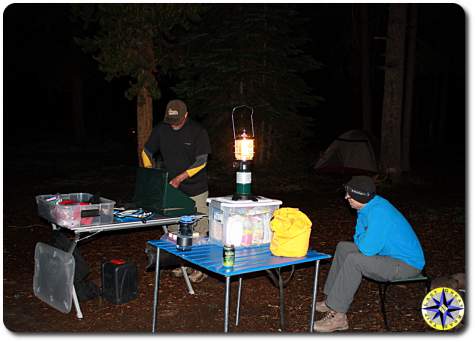
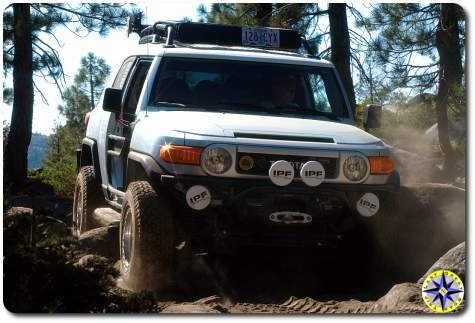
Getting ready for the Rubicon Trail off-road adventure has us going in all directions…  meals on the trail is one of them…  Rule #1 on the trail…  everything, even cardboard re-hydrated with sweat and seasoned with dirt, tastes good after a long day wheeling on the trail….  but don’t let rule #1 get in the way of enjoying the finer things in life.

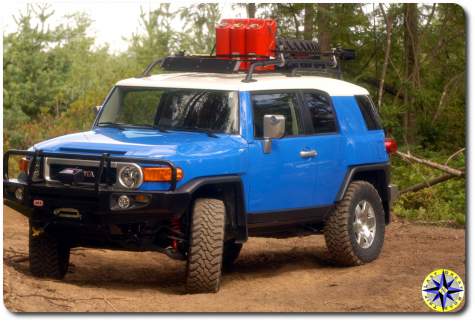
All too often we seem to go from one extreme to the other…  on the one end you have dehydrated back packing food, military rations, or a bag of beef jerky.  On the other is the steak, baked potato and corn on the cob grilled over a giant propane blast furnace that has a Turkey deep fryer for Thanks Giving around the camp fire.

Sure wheeling gives you a lot more choices than when you are having to hump all your food and gear in on your back, but there is a lot to be said for minimizing the weight in your rig and leaving a little room in the back for adult beverages and a good Cuban.Medaglia Doro

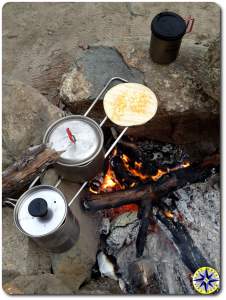
Over years of backpacking and driving off-road I have achieved a type of cooking that works for me.  It works because I can meet all my needs and still enjoy eating well in the outdoors.  On the trail I hate clean up.  I hate complicated.  I hate having to spend too much time in the kitchen.  I enjoy simple prep, easy cooking and complex flavors.  One pot meals work best for my needs…  cook in the pot that you eat out of and clean up becomes a breeze.

Coffee…  Starbucks has seen to it that our national addiction to caffeine is fully developed.  Like a junkie on the street when it hits 8:00 a.m. I’m jonesing for my second cup.  Since I don’t bring my local barista to brew me the perfect cup of espresso, I’ve had to experiment.GlaceDePouletGold

These days there are lots of new options out including, french presses, drip coffee packs, hand crank coffee grinders and  even backpacking mini espresso makers.  And They all work well but they also have one thing in common.  They take work to set up, tear down and clean.  On cold mornings, my pre-caffeinated energy level is at boiling water.  Which brings us to Medaglia D’Oro instant espresso coffee.  Yes I said instant.  Medaglia D’Oro is rich, full bodied and smooth.  You can make it as strong as you like and clean up is nothing more than licking the spoon.  While I’ve tried a number of instant coffees, Medaglia D’Oro keeps showing up in my camp kitchen kit.

ShiitakeMushroomsOne pot meals tend to rely on good stock for complex flavors as well as forming the base of the meal.  Chicken or beaf boolean cubes seem to have two ingredients, salt and fat.  Canned stock provide real flavor but you can not control the intensity without lengthy reduction time.  Using Glace de Poulet Gold from More Than Gourmet delivers on both accounts.  Requiring no refrigeration, Glace de Poulet Gold is a 20-times reduction of French chicken stock with deep, rich, toasted color and syrupy consistency.

Simplicity of ingredients and complexity of flavors are the Yen and Yang of Asian cooking.  Dried Shiitake mushrooms ,  add a great earthy flavor and rich chewy texture.  Adding dried Shiitake mushrooms to most one pot meals changes the character from bland to savory.

VIGO has two rice packs that I usually keep in my kitchen “Yellow Rice” and “Black Beans and Rice”.  The yellow rice is a recreation of a Spanish classic complete with saffron. The black beans and rice is Cuban fare made easy.  Both of these provide great flavor and will fill up the hungriest explorers on the trail.VigoYellowRice

Top Ramen was always a staple in my backpacking youth.  Filling, light weight and easy…  but of course the main ingredient seemed to be salt and fat.  These days I make my own ramen for the trail and it has much more flavor without all the salt.  A big part of making good ramen (hand-pulled noodles) is starting with quality noodles.  Most markets these days have a good Asian section where you can find chuka soba (Japanese style noodles).Chuka Soba

While beef jerky will give you the jaw muscles of a great white shark, it may not provide much to your meal.  And trust me when I tell you, adding beef jerky to boiling water does not make soup.  Brown water and soggy cardboard yes, but not soup.  Landjaeger on the other hand…  protein with a flavor punch.  These dried sausages traditionally made in Southern Germany and Switzerland can be found at your local meat market or delicatessen.  Consider it a bonus if you can find them made from venison or elk.  While I can live on these alone, when you cut them up into rounds and drop them in the pot, they release all sorts of goodness.

So with all this stuff good stuff what can you make?  How about breakfast…  Really this is one of my favorite breakfast items to get the morning started.Landjager

  • One package of Vigo yellow rice
  • a handful of dried Shiitake mushrooms
  • Glace de Poulet Gold (chicken)
  • 3 or 4 Landjager cut into rounds
  • Water according to the Vigo package plus about 1/2 cup more

Toss the water, Landjager, Glace de Poulet Gold and Shiitake mushrooms in a pot and bring it all to a boil.  When the water boils, dump in the yellow rice give it a stir, cover and reduce to as low a simmer as you can with a camp stove.  In 15 minutes give it a little stir and let it go for 5 more minutes or until all the water is absorbed.  In the mean time you should be on your second cup of Medaglia D’Oro.  Done right this dish will be creamy, full of texture and buttery rich with just a hint of smokey overtones.  Really…  or it will be hard, crunchy and burnt.  Remember…  Good cooks eat their mistakes.

amsoil products for fj cruiser

Oil Can Betty…

amsoil engine oil change suppliesOne of our off-road adventure friends, Beau Jaramillo, from Amsoil, sent us a care package that included:

  • Ea Oil Filters
  • Signature Series 0W-30 100% Synthetic Motor Oil
  • Ea Air Filters
  • Engine Flush
  • Severe Gear 75W-90
  • Series 2000 Synthetic Racing Grease

With the Rubicon off-road adventure coming up, this was the perfect time to change the oil.  Engine oil has the primary functions of lubricating and cooling the inside of the engine, and plays a major role in maintaining the engine in proper working order.  Changing the engine oil on the FJ Cruiser is an easy maintenance activity that will extend the life of your rig’s engine more than just about anything else you can do.

What will you need to change your oil:

  • 5.5 quarts Oil
  • Oil filteradding amsoil engine flush
  • Oil plug gasket
  • 14mm socket
  • Oil filter wrench
  • Oil drain bucket
  • Empty soup can (tomato is my favorite)
  • Engine flush (optional)
  • Latex gloves (recommended)

Since the rig’s odometer reads over 50K we decided to clean the engine from the inside out with Amsoil’s Engine Flush.  It doesn’t get much easier than this; just pore the contents into the engine and let the rig idle for 15 to 20 minutes.  Than change out the oil as normal.

draining fj cruiser engine oilIt is best to change the oil when the engine is warm.  This will help suspend the muck in the oil and allow everything to flow out smoothly.  This also means you need to be careful since everything is hot.

The first step is to remove the oil drain plug (fancy name for a bolt and gasket) with a 14 mm socket.   Be sure to have your oil bucket ready and a couple pieces of cardboard under everything will keep the mess to a minimum.  After the oil starts flowing is a good time to take a break…  come’on you’ve been working hard and the oil will take a while to completely drain.

fj cruiser oil filter removalWhen the oil is coming out in only drips, remove the oil filter.  The oil filter may still contain old dirty oil that will run out when you remove it and this is where that soup can comes into play.  Hold the soup can under the oil filter assembly to catch the oil that flows out. The assembly has a little tube that allows for you to hook up a hose and drain the out flow to your oil catch bucket, but a old soup can held in place works too.

STOP…  get back under the rig now and using a new oil plug gasket, put the oil drain plug back into the oil pan (Toyota recommends 30 ft / lbsf torque for the oil drain plug).   You really don’t want all that fresh oil running down the driveway.

adding amsoil to fj cruiser engineWith the new oil filter in hand, take a dab of fresh motor oil and wipe it lightly on the oil filter’s rubber ring seal.  Screw the new oil filter onto the union (fancy name for the hollow tube the oil filter attaches to) by hand.  Be careful not to get the oil filter cross threaded on the union.  This is a good time to wipe down any oil that may have spilled and double check that the oil drain plug is in place.

The Toyota owners manual will tell you the oil capacity is five and one half quarts, that’s 5.2 liters to you and me.  Now depending on your aim you may want to use a funnel to minimize the mess when poring the motor oil into the oil fill spout.  Toyota recommends SAE 5W-30  weight motor oil.  Thanks to Beau we upgraded with AMSOIL Signature Series 0W-30 100% Synthetic Motor Oil.   AMSOIL Signature Series claims an extended life with recommended changes at:fj cruiser dip stick check

  • Normal Service (personal vehicles frequently traveling greater than 10 miles (16km) at a time and not operating under severe service) – Up to 35,000 miles or one year, whichever comes first
  • Severe Service (turbo or supercharged vehicles, commercial or fleet vehicles, extensive engine idling, first and subsequent use of AMSOIL in vehicles with over 100,000 miles, daily short trip driving less than 10 miles (16km), frequent towing, plowing, hauling or dusty condition driving) – Up to 17,500 miles or one year, whichever comes first

Once you pour in the 5.5 quarts of oil and replace the filler spout cap, start the engine and allow the rig to idle for a minute, than turn off the rig and check the engine oil level.  The correct way to check the oil level is to park the rig on level ground, allow it to sit for a minute, remove the dip stick, wipe the dip stick off with a clean rag and re-insert it as far as it will go.  Pull out the dip stick and read the oil level.how to read engine oil dip stick

The final thing to check is for any drips coming from the oil drain plug or oil filter.  It’s not likely but a second look is well worth it.

When changing your own oil, don’t forget to check the other fluid levels (brake, power steering and coolant)  and top off the windshield washer fluid.  This is also the time to change the engine’s air filter and check your tires’ air pressure.

white 2010 toyota trail teams fj cruiser

Toyota ’10 Model Year FJ Cruiser

There appears to be an encore year for Toyota’s flagship off-road truck, the FJ Cruiser.  Rumors of its death may have been premature as Toyota releases it’s “What’s New ’10 Model Year” lineup notes. And would you believe it… the FJ Cruiser is in the line up.

With more horse power, little better gas mileage and a Trail Team Special Edition the 2010 FJ Cruiser looks to continue the rugged off road capabilities that made the legendary Land Cruiser lineup one of Toyota’s best.

But the news is not all daisies and love. The iconic Voodoo Blue color scheme is being retired. And while the Voodoo Blue color makes the rig look like Papa Smurf, it has always been one my favorites, always stands out in a crowd. It will be replaced with Army Green for ’10.

And although we have to say bye bye voodoo, we are pleased that the Toyota FJ Cruiser appears to hold favor with off road enthusiasts, SUV consumers and Toyota alike.  Who knows we could learn to like Army Green!

You can read more on the FJ Cruiser and a few other Toyota rigs in the Toyota ’10 Model Year Lineup notes.  W can neither confirm nor deny the existence of the Toyota lineup notes for this model year… however we can confirm that 2014 is slated as the last model year for the iconic FJ Cruiser.

fish out of water

Big Breath, Hold It… Hold It…

fj cruiser air filtersOk, Let it out…  and breath.  How to change your Toyota FJ Cruiser’s engine and cabin air filter.

Here are the filters needed:

When your FJ Cruiser can’t draw in the fresh air it needs, your engine runs less efficiently, gas mileage plummets and horse power evaporates.

The easiest way keep your engine running at peak performance is to regularly check the air filter and change it when it becomes filled with dirt and debris.

Depending on where you live, how you drive and where you take your rig off-road, your maintenance schedule including the engine’s air filter can change.  At a minimum, the air filter should be checked with every oil change and replaced (or cleaned if its a reusable filter) every 8000 miles.

The lessor known and often over looked cabin filter should also be replaced.  A dirty cabin filter can contribute to the pollution circulating inside the rig and place an unneeded stress on the air condition unit which may work over time trying to cool the interior.

Luckily for FJC owners, the factory engine and cabin air filters on the FJ Cruiser are one of the easiest maintenance items to perform.  Each takes only a couple of minutes and with a little on-line shopping, an FJ Cruiser engine air filter can cost less than $15.fj cruiser engine air filter clips

Starting with the engine’s air filter the steps are:

  1. Lift the hood, locating the air filter housing and the two clips that hold it in place.
  2. Flip the two clips open releasing the air filter housing and allowing you to pull it away from the engine and exposing the air filter inside.fj cruiser engine air filter in air box
  3. The filter, although fitting snugly inside the housing, lifts directly out.
  4. After pulling out the old dirty filter, simply drop in the new clean one into the housing.
  5. slide the housing back into place and re-secure the clips holding the air filter housing to the engine.

That’s it. Your done.  Really…  Two minutes tops and your engine will thank you, it can now pull in all the air it needs to achieve the most effective air fuel mixture creating the combustion that will power the rig at peak performance.fj cruiser glove box stopper locations

Now that you mastered the engine air filer and are on a roll it is time to move to the interior.

  1. The FJ Cruiser cabin air filter is hidden behind the glove box. Remove the glove box by unclipping the hinge pin and than pressing in on the sides of the glove box as it lowers down past the stoppers.fj cruiser cabin air filter compartment
  2. The cabin air filter is inside the fan housing that is now exposed.  By pressing the two clips on the face of the fan housing will you can remove the filter tray.
  3. Remove the old filter from the tray and replace it with the new one.  The filter is flexible and will slide under the retaining clips on the tray.new fj cruiser cabin air filter
  4. Place the filter tray back into the fan housing
  5. Replace the glove box.

That is all there is too changing the cabin air filter.  And depending on how dirty the filter was, you should notice an improvement in the air flow the next time its hot and you need turn on the AC.

You can also save money by making your own cabin air filter.

fj cruiser walker evens beadlock wheels dirt road

The Wheels On The Rig Go Round And Round

new walker evens beadlock wheelsYup, I’m talking beadlock wheels.  IHRA Pro Stock cars, CORR trophy trucks and vertical wall scaling rock crawlers all use them.  But how exactly do they work and what does it take to install them.

When an IHRA Pro Stock car travels down the quarter-mile in under eight seconds or an off-road truck airs down real low certain physics take over causing a tire to loose its grip on the wheel often resulting in the tire falling right off the rim.  Beadlocks over come this physics problem with a separate ring bolted to the wheel, holding the tire tightly in place.  Air pressure is replaced by bolt torque to hold the wheel on tight… in less than ideal conditions.

When it comes to beadlock wheels you’ll need to choose a manufactured wheel or cut up a steel wheel and build your own.  For our rig we decided to go with Walker Evens 17″ beadlock wheels.  Born out of desert racing, with 30 years of off-road racing experience, and more than 140 off-road racing victories we figured Walker Evens knows a thing or two about wheels.  The Walker Evens beadlocks are cut from cast aluminum rated at 3,800 lbs with grade 8 bolts and holes for valve stems that have been set back out of harms way.  Walker Evens beadlock wheels are cut to order and available with custom back spacing.  We opted for a 3.75″ back spacing.pile of old wheels and tires

The items required to mount the tires onto our beadlocks and balance them isn’t a long list but requires a couple of inexpensive specialized tool:

  • Valve stem tool
  • Valve core tool
  • Torque wrench
  • 1/2” Socket
  • 19mm and 21mm Socket (lugs)
  • Ratchet strap
  • Air source
  • Rubber mallet
  • Valve Stems (.453 rim hole, 1 ¼” long)
  • 8 ounces  per tire of Dyna Beads in easy open bag (how to balance off-road tires with Dyna Beads)
  • Valve core w/ filter (keeps Dyna Beads out of the valve stem)
  • New lug nutstire on walker evens beadlock wheel

This mod is about as hard as changing a tire on the difficult scale but it is time consuming.  Plan for about one hour per tire, bring a stool.

  1. In our case step one… get the tires off the old stock rims.  You pull the valve stem core to empty the tire and use a hi-lift to push the tire off the wheel.  We punked out and took them down to Les Schwab, paid the $4 per tire and called it good.  After all this is how to mount tires on beadlocks, not how to take tires off a stock rim.
  2. Grab one of the new valve stems and using the valve core tool, remove the core than insert the new core fitted with the filter.  This step ensures the beads we will use to balance the tire don’t clump up in the valve stem. The core simply screws in and out.
  3. Insert the valve stem through the wheel and using the valve stem tool, pull the valve stem through until it seats in the wheel.
  4. Place your wheel flat on the ground and work the tire’s inner bead over the wheel.  Sounds simple enough doesn’t it.  This involves setting one side of the tire’s bead over the lip and than hurling yourself through the air and landing on the tire forcing the remainder of the tire over the wheel’s lip…  This may take a couple of times… and it isn’t pretty.torque bolts on beadlock wheels
  5. Now that tire is on the wheel, open the bag of Dyna Beads and place the beads, bag and all, inside the tire…  that is all there is too it.
  6. Stop!  Are you sure the valve stem is inserted? Are the Dyna Beads in side? You really don’t want to find you forgot to insert them after you’ve bolted up the ring…  It could happen.
  7. Take your rubber mallet and knock the outer tire bead onto the lip the wheel so it sits on the wheel snugly and the locker ring will fit on top.
  8. Place the locker ring on the wheel and hand tighten all 24 the bolts. Use a crisscross pattern and ensure you don’t cross thread any of the bolts.ratchet strap to set tire bead
  9. Grab your torque wrench and start tightening the bolts in a circular pattern.  Walker Evens recommends first torquing the bolts to 10 ft/lbs than 15 ft/lbs and finally 18-20 ft/lbs.  Get comfortable this is going to take awhile.  My advice here is to really chase the bolts around at the 10 ft/lbs setting until they all are torqued…  It will take going round and round and round… and around but the work here pays off on the next two setting which will torque up much more quickly.  No matter how you do this, it is going to take time…  I’ve had dates that took less time than it took to get all 24 bolts torqued up correctly.
  10. Ever wonder how to re-inflate a tire if you roll a bead on the trail? Well here is your chance to practice. Take a ratchet strap, wrap it around the tire and tighten it down.  You will have a large gap between the back of the wheel and the tire bead but the tire should be pressing down against the wheel. Using your air source begin to air up the tire normally.  Caution! Unless you have a crush on a doctor or nurse at the emergency room and want a reason to visit them, keep your fingers out of that gap between the tire anddifferent lug nuts on scale wheel. As you inflate the tire, it will slide out closing the gap between the wheel and tire.  You will get a loud pop when the tire bead finally seats itself on the wheel.  When tire does seat itself, stop inflating, remove the ratchet strap and finish airing up to the tire manufactures recommended setting.
  11. Rinse and repeat for the rest of the wheels.

When you select your wheels, check which type of lug nut is required.  Our stock FJC wheels used a flat mag style lug nut and bushing.  The Walker Evens require a cone style lug nut…  of course.  We opted for the titanium colored aluminum voodoo blue fj cruiser walker evens beadlock wheelsracing lug nuts from Gorilla Automotive.  They are strong, super light and high on cool factor.

With the tires mounted and balances, it was simply a matter getting them onto the rig.  Since you have the torque wrench out be sure to use it…  According to the Toyota manual, lug nut should be torqued to 85 ft/lbs.

After care:

  • After 25 miles, re-torque all your lug nutstoyota fj cruiser metal tech tube bumper total chaos long travel
  • Walker Evens says to re-torque the beadlock ring bolts every other week for the next six months.  No one said cool was maintenance free.

With the extra back spacing and our 2″ long travel kit our rig’s front stance is now 82″ wide…  great for stable speed, bomb down desert roads and play in the off camber stuff…  not so much for squeezing through gate keeps.  Every thing is a trade off…

sliver fj cruiser driving rubicon trail

Get The Lead Out (it is all about balance)

dyna beads ez open bag of wheel balancing beadsNo more shakes and shimmies, better gas mileage and longer tire life what’s not to like…

Spinning tires wobble if they’re not perfectly balanced.  To avoid having your off-road truck shimmy and shake while bombing down the back roads, usually means taping lead weights on the sides of the wheel until a bubble level reads top dead center.  The trouble with lead weights is that they are difficult to  place exactly right, they can fall off on an off-road adventure when wheels and rocks meet.  Additionally as the tire wears the weights are no longer in the right spot. Heavy mud terrain tires require a lot of weight in order to achieve balance.

We recently installed our Toyo Open Country M/T on new beadlock wheels and instead of the usual lead weights we decided on tiny high-density ceramic Dyna Beads from Innovative Balancing…  So how can a few ounces of tiny ceramic beads balance a 75 lbs tire?  Well for those of you who where eating pizza in Mr. Hand’s physics class when he covered centrifugal force, here is how the tiny beads dynamically balance a spinning tire:how centrifugal force works to balance tire

  1. beads are placed inside the tire (big space filled with air…  not inside the rubber…  just want to be clear) and sit at the bottom tire when the rig is at rest
  2. as the rig begins to move the wheel starts to roll and centrifugal force distributes the beads all around
  3. every time a heavy spot on the tire goes up on the rotation it pushes the beads down and away from the heavy portion of the tire
  4. quickly the oscillation frequency reduces and the beads move less and less
  5. when the wheel achieves perfect balance centrifugal force holds all the beads in place

These little beads will work on 18 wheelers, RVs, trucks, cars, motorcycles.  If it has wheels, the laws of physics hold true… Ok that’s enough but this will be on the test.

Checking the charts, our 295/70R17 E rated tires required between 6 and 8 ounces of Dyna Beads for each tire. Innovative Balancing sells pre measured bags so we order up a bunch of 8 ounce bags.  The beads themselves come in two sizes, standard and bigger…  we went with the standard size since they offer a couple of installation options but you do need to install their filtered valve stem core.

Since we were mount tires onto new wheels, once the tire was on the wheel we place one 8 ounce EZ Open bag of beads inside the tire cavity and than set the tire and aired up…  yeah that is it.  The EZ Open Bag is designed to open and release the beads the first time the wheel starts to spin.  Your other option is to remove the valve stem core and pore the beads in.  A clear plastic break-bleed hose works well  to guide the beads into the valve stem or you can buy Innovative Balance’s applicator (little bottle w/ clear plastic hose).  Just keep tapping the hose and valve stem  (or tape a pocket rocket to the valve stem) to keep the beads flowing.

tire valve stem coreRegardless of how the beads get in, you will want to install a new filtered valve stem core, unless you have a tire pressure monitoring system(TPMS), to keep the beads from clumping in the valve stem.  If you do have a TPMS, Innovative Balance said the TPMS will block out the beads without a filtered valve stem core…  but it also means you wont be poring the beads down the core…  You win some you loose some.

One safety tip from the Dyna Bead guys…  if you use tire bead soap avoid getting any inside the tire or on the Dyna Beads.  We did not use any tire soap so no worries.

So the million dollar question is…  do they work?  We took the rig out on the highway to see if there was any wobble.  We did not notice any wobble or shaking as we drove the back roads tooling along at 35 mph, starting out or stopping.  And at 70 mph the ride was smooth as a Ken Doll.  Not a jitter or shimmy from the steering wheel as we sailed down I5.  Big heavy tires are notoriously difficult to keep in balance sending them into a death spiral – Tire out of balance leads to uneven wear which leads to the tire becoming more out of balance, leading to more wear…  These beads dynamically balance the tire each and every time reducing wear, increasing mileage and ensuring a smooth ride.

So the next time Boy ask “when am I ever going to use physics in the real world”…  I have the answer and a smooth ride.

Update: after tens of thousands of miles and a second set of tires using the Dyna Beads we can tell you that we are very pleased with performance and will continue to use them to balance tires for our off-road adventure truck.

fj cruiser dash pod console

15 minute Gadget Wire-Up

garmin car GPS kitI love all the gadgets available these days that make getting to your off-road adventure a breeze.  But I hate wires dangling all over, getting in the way and generally creating a big spaghetti mess. Sure you can hard wire the gizmo into your rig’s electrical but than you can’t easily move it to another rig and you still have to route the wires.  So to satisfy my love hate relationship with gadgets and keep it simple I came up with the 15 minute GPS gadget wire-up.fj cruiser grab handle screw access

Although I performed this mod using a Garmin nav which is stuck to the windshield, it will work with most dash or windshield mounted gadgets.

States have numerous rules of the road and one law that many states have adopted is the placement of a windshield attached gadget.  The nav unit needs to be placed in the  lower corner of the windshield (check your state’s regulations).  So in order to keep us out of trouble and allow my navigator quick access, I choose the lower passenger side but this mod will work equally well on the drivers side.

In order to run the power from the GPS  to the auxiliary fj cruiser inner apillar pannel removedpower supply down on the console, we are going to run the power cable under dash, behind the glove box and up to the power source.  This simple mod will require a 10mm socket, a small flat screw driver, a couple of zip ties and 15 minutes.

Use a thin piece of ridged plastic (a popsicle stick or small screw driver will also work) to remove the bolt cover on the “oh my god” handle on the A-pillar.  Slide the screw driver  between the top of the cover and the handle pressing downward a little as it slides in.  After both covers are off, remove the two 10mm bolts holding the handle to the A pillar.

With the handle removed, the A pillar cover is held in fj cruiser glove box stopper locationsplace with two small plastic snaps.  Gently pull the inside cover away from the A pillar.  The snaps will release their grip allowing you to remove it and gain access to the dash.

Now that the top is exposed, we move on to the glove box.  The FJ  Cruiser’s glove box is held in place with a single hinge pin and two stoppers.  Open the glove box and slide off the hinge pin which is attached to the glove box power to garmin gpson the right side.  After sliding off the hinge pin, press on the outside of the glove box’s sides, pushing inward, to allow the stoppers to come forward.  The bottom of the glove box is attached with an open hinge design and you can easily lift it out.  You should now have clear access to route your power code.

Run your power cord down from the top of cigarette lighter power adapterthe dash and over to the console zip tying it to keep the cord out of the way and in place.   Since we also use the auxiliary power outlet  to charge up the iPod we added a splitter to keep the power flowing to the GPS nav as well as any other gadget we might have on board.  To keep things simple we slide the power cord between the front console cover and floor covering rather than than removing console.  Remember we wanted to keep this simple and easy.garmin power cable through fj cruiser dash

After the cord is in place give the nav a quick power test to ensure power is flowing freely, before buttoning everything back up.  To put your FJ Cruiser back together, reverse the process, setting the glove box in place followed by snapping in the inside cover of the A-pillar and than bolting up the “oh my god” handle.

garmin car gps fj cruiser winshield mountedThis mod is not going to make you go faster, ride higher or improve your gas mileage but it will keep the power cords out of the way, lend to a neat clean appearance and allow you to worry less about anything getting hung up on your power cords.  Best of all…  the GPS nav is easy to see while still keeping an eye on the road as we find our way to our next off-road adventure.